NOTE: Recommend use of Google Chrome, Firefox or the most up-to-date version of Edge, a strong internet connection and turning off any VPN for you and your presenters.
Introducing the WorkCast Interactive studio
Elevate your virtual meetings with the Interactive Studio—a seamless blend of cloud slides, webcams, screen sharing, and video playback, all in one intuitive platform.
Whether you’re presenting, collaborating, or demonstrating, the Interactive Studio makes it effortless. Say goodbye to juggling multiple tools and hello to a unified, easy-to-use studio that transforms the way you connect and engage online. Make every interaction count with the Interactive Studio!
What does the Interactive Studio look like?
When you first login to the interactive studio you will be presented immediately with the Presenter Only Chat pod, the My Connections Pod and the Cloud Slides pod.

Note: The studio does remember preferences so your view will change should you close or move a pod in a previous studio. If you can not see My Connections pod on the screen, toggle the My Connections option to green on the left hand side pods menus. The pod should appear, you may need to click the + icon expand the pod.
You can invite up to 16 presenters, all in one place! However, for smoother event management, we recommend inviting only those who will be speaking or presenting. This keeps things more manageable for Producers and ensures a streamlined experience.
Features of Interactive
Cloud Share: Cloud Share is our new feature in the Interactive Studio which allows you to share slides and video all from one place and allows all users within the studio to control these!
Your slides and video need to be uploaded into your account first. Once uploaded, you can easily select the slides and video within the pod and these can be controlled by all users within the Interactive Studio.
Screen share: Whether you want to demo technology directly from your device or present your own slides using PowerPoint, it’s all possible with ease in the Interactive Studio. Enhance your presentations with real-time screen sharing!
Share video: Want to showcase a recorded demo or a pre-recorded presentation while keeping live elements in your event? No problem! Our Interactive Studio has you covered, allowing you to seamlessly blend pre-recorded content with live interactions for a dynamic and engaging experience.
Follow me: Use the follow me feature to change the viewing experience of your attendees:
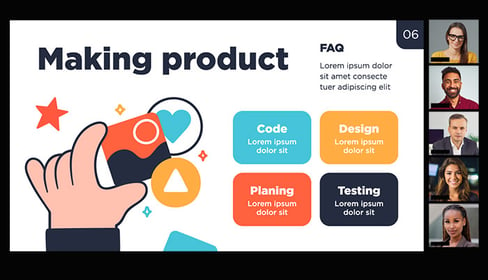 Full screen - Want one large main window and all active webcams showing? No Problem! Our Full screen layout allows you to share slides/media with space for multiple small webcams within the right hand column. This is the default broadcast view unless you have the 'Everyone follows me' option selected.
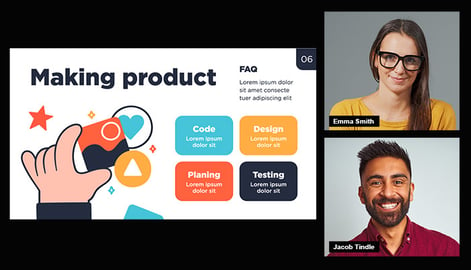 Two Thumbnails Layout—Want a clear and organized view with one large main window and two sizable webcam thumbnails in the right-hand column? No problem! Our two thumbnail view allows you to share slides/media while the active speaker’s webcam will automatically occupy the one of the two available slots. This layout ensures that both your content and speakers remain in focus, providing a seamless and engaging experience.
 Grid View—Want your attendees to see the entire panel? No problem! Our grid view feature has you covered, displaying every active webcam on screen so everyone can be seen and heard. Perfect for fostering engagement and keeping the focus on your presenters!
Useful articles


