The Reminder Emails are found within the Review Attendee Emails tab of your event and are scheduled to the specifications agreed when creating your Master Template.
Typically this would be two emails scheduled 1 day and 1 hour prior to the event with a subject line of reminder email.
Should you wish to edit your emails we recommend the following steps:
-
Deactivate all activated emails and save.
-
Make changes (use the image below to learn more about the sections you can edit)
-
Add emails to the schedule queue
-
Test emails
-
Activate the emails you’d like to dispatch.
Scroll to the Reminder Email section.

-
Activate: this is where you activate/deactivate the reminder emails. When you have completed any edits to the email section please ensure you check this box to reactivate the reminder emails to dispatch to your registrants.
-
Template: This is the email template used on your reminder emails. Typically this will be the same template as the confirmation email and should be titled similar to Confirmation/Reminder 2023. To change the template used to an alternative click the drop down option where a list of all available email templates will show ready to be selected. Note: Standard email templates will not be branded to your organisations colours.
-
Sender name: This is typically your company name but can be changed
- Primary event session: The event title will show here.
-
Subject line: This is the subject you’d like to show on your reminder email. Please note, you are able to have a different subject line for each reminder email scheduled.
-
Schedule: Use the dropdown options to schedule reminder emails to be sent up to 30 days before the event start date and time. You can choose from intervals in days, hours, or minutes. If you're only updating the sender name or subject line, select the desired time and click the Add button to place the email in the queue. To customize the email body, proceed to step 7.
- Show Custom Email Configuration: Click this option to reveal two text boxes that allow you to customise the body of your email. Here, you can add text, hyperlinks, and images to tailor the email to your event. Each reminder email can also have a unique subject line. After customising the email body and adjusting the schedule (step 6), click Add .

-
Schedule Queue: this is where your already scheduled emails will display once they’ve been scheduled. Here you can see email information such as
-
-
Subject - This is specific to the scheduled email when it was queued. If incorrect you would need to re configure and reschedule the email.
-
Dispatch Date/time - This is the date/time the email is scheduled to dispatch based off the day, hour, minute you selected. (Please note the Timezone will match that of the event. I.e if the event is GMT and the dispatch time states 11am this will be GMT.)
-
Status - Prior to the scheduled time this will show as Pending. This will then change to Processing when the email is dispatching and finally Dispatched when all emails have been sent.
-
Last Updated - This shows when the email was added to the queue
-
Test - Once you’ve scheduled the email, click on the envelope icon to send yourself a test to see how this appears to attendees.
-
Remove - By clicking the X icon you can remove any email from the queue.
-
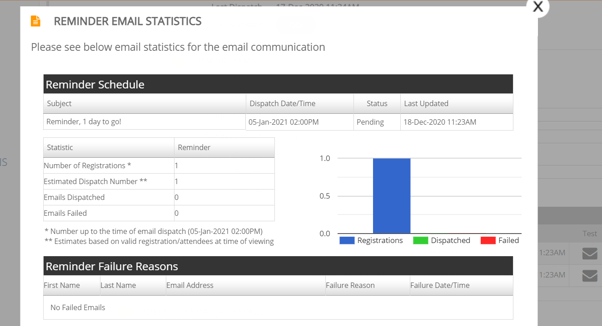
Stats - Here you can see how many emails were successfully dispatched to your registrants. This will also show any emails which failed and the reason why.
-
Once your required changes have been made, you can then reactivate the emails by checking the Activate box on each email you wish to dispatch.
Remember to then save your changes.
You can now edit the event emails. Please select from the options below:


