Add Images & Links to Your Webinar
Click from the options below to be navigated to the relevant steps for adding an Image or Link to your event.
Images
Links
Adding Images
Important note: Ensure the image you want to add is sized accordingly. i.e logos should be 250px width, full width Reg/Aud banners should be 2100px width and email banners should be maximum 600px width.
The file name of the image saved to your device should have NO special characters or spaces in the name. i.e ‘Example Image!’ should be ‘exampleimage’
There are two steps to complete when adding an image to your event Registration/Auditorium:
STEP 1 - Uploading the image to the platform to generate a digital URL
STEP 2 - Adding this to the event page i.e Registration page or Auditorium description box
STEP 1
-
Within the Session Setup & Studio Access section of your event click Features.

-
In here locate the 'Resources' section and click the orange 'ADD DOCUMENT'

-
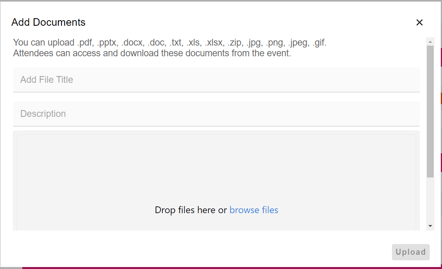
A pop up will appear click ‘Browse files’ and select the image you’d like to add.

-
Add a File title. This can be any title you'd like. i.e 'Logo' and click 'Upload' once the file is uploaded close the pop up.
-
In the Resources section you will now see the below indicating that the platform is generating a URL for your image. This can take between 5 - 10 minutes to appear.

-
To access the link quickly, to the top of the Features tab click ‘Save’ You will then see the blue bar with two options. Preview and Publish draft. Wait around 1 - 2 minutes and click Preview.

-
A window with a preview of your event auditorium will appear. Locate the Resources section in your event auditorium, here you will find your image. Click the link to open.
-
A new tab will open showing the image. Copy the URL from the search bar.
STEP 2
-
Navigate to the page you’d like the image to display (Registration tab or Event Experience + Content tabs.)
-
Click into the Display box you’d like to add the Image and select the ‘Picture’ icon.
-
A pop up will appear with two text boxes. Enter the previously copied URL into the top box and click insert. The image will then show in the content box.

-
Click Save and Preview to check the image displays as you’d like on the event page.
If you are happy with the image, click back into the Features tab, locate the image under Resources and click the X to remove this from resources. Finally Save and publish Draft to make this available on the Live event page.
OR
If, after checking the Registration or Auditorium page you’d like to resize the image. Click the image within the Display box. Options will appear below the image, Click the Pencil icon.

The below box will pop up with sizing shown beneath the image thumbnail. Enter the size you’d like this to display and click ‘Ok’
Click Save and Preview to check the image displays as you’d like on the event page.
If you are happy with the image, click back into the Features tab, locate the image under Resources and click the X to remove this from resources. Finally Save and Publish Draft to make this available on the Live event page.
Adding Links
Within the WorkCast Platform you are able to add links to other pages within the content box’s and form fields should you wish to. To do this:
-
Add the text you’d like to display on your Registration / Auditorium page into the desired Description box.
-
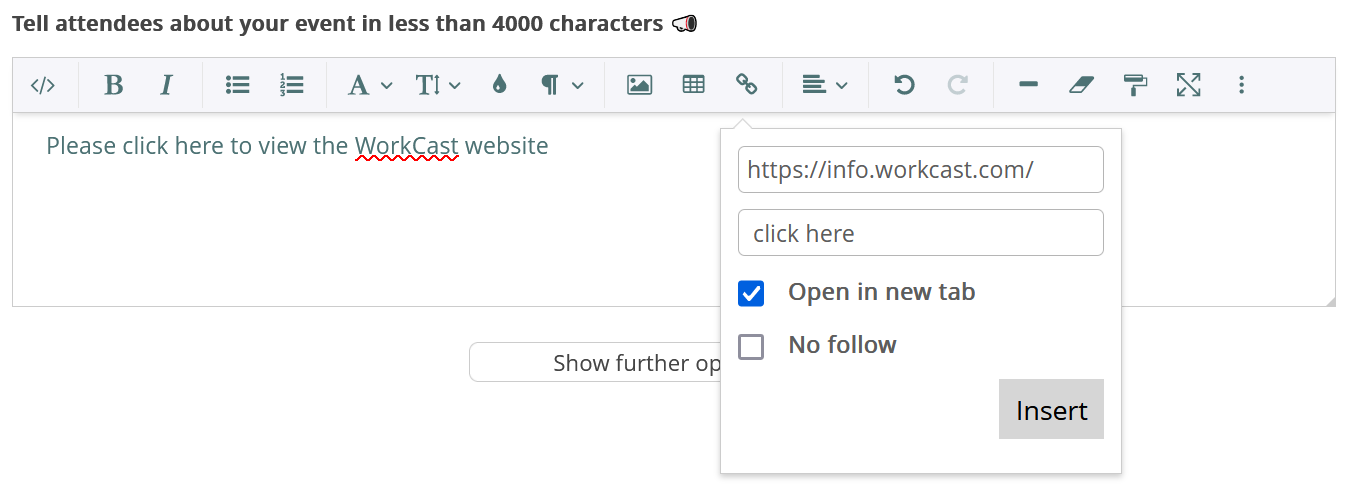
Highlight the text you’d like to link to the website URL and click the chain link icon from the formatting toolbar. (Note: When you hover over the different buttons, they will advise what they are for, for example when you hover over the one below link appears.)
-
In the pop up, you will see two text boxes. In the first textbox, enter the URL you’d like the word/sentence to link to.
-
Tick the ‘Open in new tab’ check box, this will open the URL in a new tab instead directing them away from your event page.
-
Click ‘Insert’

The link is now created. To make this available to your audience click ‘Save’ and ‘Publish draft’ located to the top of the Registration, or Event Experience Tab.
We do recommend you open the event page and click the link to ensure it loads to the correct page.
![workcast_logo_orange-01.png]](https://insite.workcast.com/hs-fs/hubfs/workcast_logo_orange-01.png?height=50&name=workcast_logo_orange-01.png)