πŸ“§ Emails

How to edit Event Emails

Within the Review Attendee Emails tab you have the ability to edit the attendee emails which will dispatch to you registrants.


How to edit

When an event is created the Confirmation emails and Reminder emails are automatically activated and ready to dispatch to your registrants. Because these are activated many of the content boxes will be locked or "greyed out".  To unlock these, you first MUST deactivate all active emails. 

  • Navigate to the  Review Attendee Emails tab within your event.
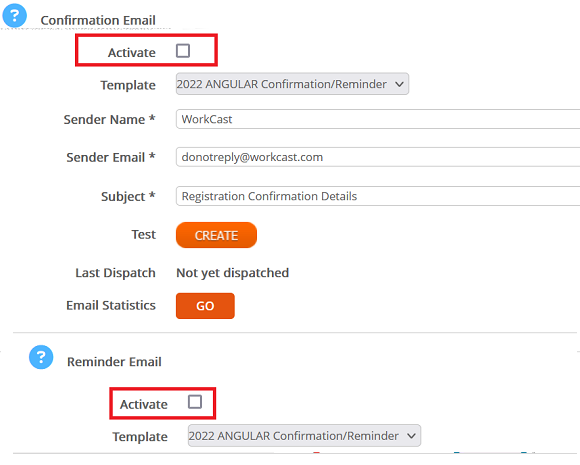
  • Scroll down to the Confirmation email and Reminder section and untick the Activate check box. (Please note if Post Event emails are activated they also will need to be deactivated) 

  • Scroll to the top of the Review Attendee Emails tab where you will see a green bar with a Save. Click Save. 

You now are able to edit the previously greyed out options. 

Note:  Once your required changes have been made, you’d then reactivate the emails by checking the Activate box on each email you wish to dispatch and pressing the green save bar which will then save your changes.  


There are some changes which can be made for All emails such as the Title, the way the Date/Time is displayed, and the ability to add in an Alternative URL  which will change the β€˜Join’ link which will lead your attendees to your event if it is embedded on an alternative website.  

Other changes are made in the Confirmation, Reminder, Post event - attended and Post event - did not attend sections such as the email subject line, sender information, template used. 

Quick Links 

Changes to the Title, Date/Time, Alternative link

Changes to the Subject line, Template, sender information and more

Custom Template changes


Changes to the Title, Date/time, alternative link

  1. Email & Calendar title: This is auto populated when you first create the event with the Event title and does not change if the title is updated. Should the event title change or you wish for a different title to display, you WILL need to update this section so your event emails and the calendar are also updated. 

  2. Alternative Event Date Format:  If left blank the date/time will display with the time and date as follows 12am (UK) on Thursday 27th April 2023. If you'd like the date and time to display in an alternative language or format add this here. I.e Thursday 27th April at 12pm BST

  3. Alternative Attendee Access Link URL: This will be blank to start with and can stay blank for most events. However, if you are embedding your event onto another webpage but using the WorkCast Emails, you will need to add the URL that the event is playing within here. This updates the join the event in the email communications and will direct to the link within the Alternative Comms link URL, rather than the WorkCast event page.

Please see below how this would appear 


Changes to the Subject line, Template, sender information and more

Changes to the Subject Line, Sender name, Sender email and template are all completed on an individual email basis. This includes scheduling the emails to dispatch and also the ability to send test emails to yourself and the email statistics. Please click from the options below to understand how to change the relevant section: 

Confirmation Email

Reminder Emails 

Post Event emails


Custom Template Changes

Please note the following changes require a custom email template. If you would like further information please reach out to your Account manager. 

With a Custom Email template you have the ability to edit the body of the email. This can be

    • Additional text which can be changed on an event basis.

    • A survey link 

    • A certificate link

    • and more. 

To do this, the team add HTML coding to the template which allows you to update in the Review Attendee Emails tab on a per event basis. Below is how to update: 

  • Locate and click the Show Custom Template Configuration text in the Calendar information section of Review Attendee Emails tab.

  • You will see a further two text boxes appear Additional Field and Email Header Banner URL.

Typically, the Additional Field is the box to edit unless you are otherwise advised by the WorkCast team. 

Once you've added in the content, scroll to the top of the Review Attendees email tab and Save

Note: Only the Custom template will display the information added into this section. Other Standard templates will not display this.