We aim to provide you your registration URL within 1 to 2 working day after content is submitted to WorkCast.
Quick links
- How to locate your event
- Change platform event title
- Registration tab
- Session Setup & studio access tab
- Submit for review
How to locate the event
Log in to WorkCast using the login details provided by the Event Support team (If you do not have user details or need these resending please let us know on your event ticket thread.)
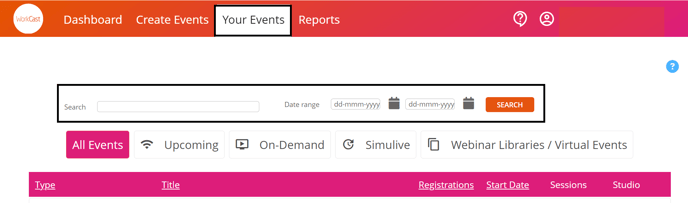 Once within your account navigate to the Your Events tab.
To locate your event please using the date range options to filter to the correct date and click search.

Once filtered you will see an event with the title set to 'Please edit this event... Date'
Click on the title to enter the event.

Add event content
Change platform event title
This title is used to locate your event within your account, on attendee emails and the add to calendar function.

At the top of your event page, you’ll see the title "Please edit this event... Date." To modify this, click on the text, delete it, and replace it with the correct event title.
Under the title you will see the date/time and duration.
Please do not update this. If you'd like to change these details please email us at events@workcast.com.
Registration Tab
The registration tab will automatically be selected. Here you can update the form field questions asked of your perspective registrants and add your registration page overview.
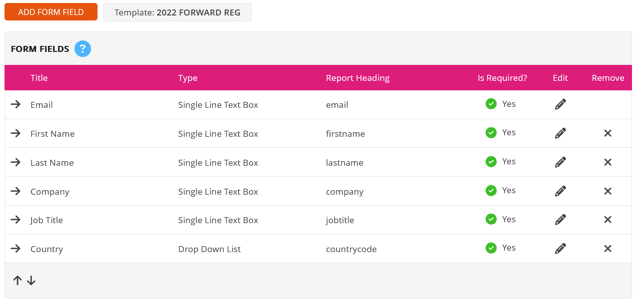 Form fields - default form fields will be applied from your master template. If you need to add additional fields click Add form field.
 Here you can choose from Standard form fields (i.e first name, email) or add a Custom form field.
NOTE: Do not put any special characters, capital letters or spaces in the report heading.
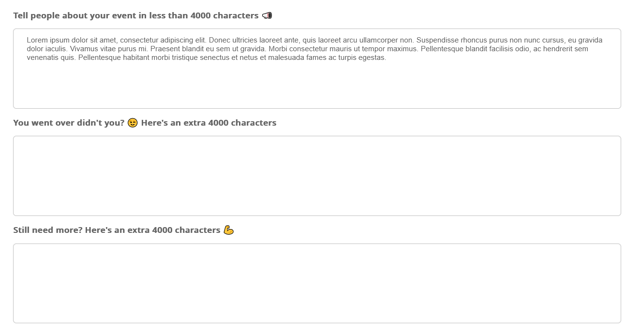 Registration page overview - there are 3 content boxes available to add your registration page overview. Each content box has a 4000 character limit.
You can also link any text or add in images. To link or add images follow our guide here.
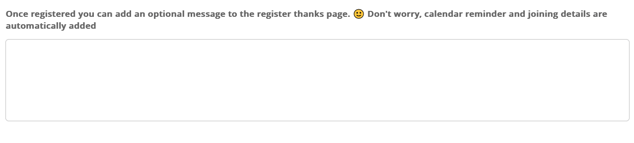 Register thanks page: the fourth content box is optional and used to add content to the thank you page. This page appears after a registrant clicks submit. This content will appear underneath the 'join event', 'add to calendar' 'FAQ' icons.
Please ensure you click the green SAVE button after making changes and before you move onto the next section.
![]()
Session Setup & Studio Access tab
This tab allows you to add content which will show on all pages and in the auditorium specifically. There are multiple tabs within this section.
Content
 Please update the "Please edit this event...." text to match the title of the event.

Title and Time - in this content box add the title, date and time as you'd like it to display to your attendees on all event pages. This should include any time zone's you like to display. 
Auditorium overview - there are 3 content boxes available to add your auditorium overview content. (Click Show further options to see the additional boxes) Each content box has a 4000 character limit.
You can also link any text or add in images. To link or add images follow our guide here.
Please ensure you click the green SAVE button after making changes and before you move onto the next section.
![]()
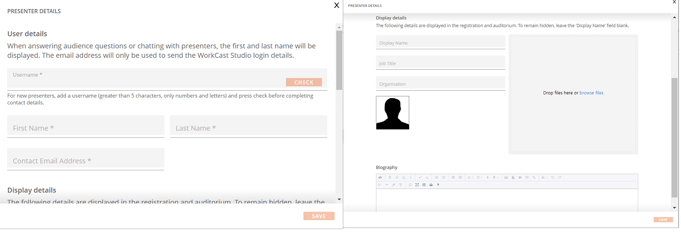
Presenters
If your presenter has already taken part in a previous WorkCast event, they will already have a profile ready and available to use.
 To locate this click Add Presenter. In the pop up, use the search bar to locate the presenter.
If you cannot see the presenter but they have previously been created please reach out to us on your event ticket to ask us to locate this for you.
Create new presenter

If the presenter has not previously taken part in one of your WorkCast events click Create new Presenter
A pop up will appear on screen. There are two sections to creating a presenter:
1. Presenter details - These details are used to create the user within your WorkCast account and are not visible to attendees.
2. Display details - these details show on your Registration and auditorium pages.
NOTE:
When creating a username, do not add any spaces or special characters. We also do not recommend using an email address as a username.
Please ensure uploaded presenter images are sized at 80x80 pixels, to help with getting your images to be the correct size, you can use something like befunky.
Please ensure you click the green SAVE button after making changes and before you move onto the next section.
![]()
Features
Engagement option - here you will select how you'd like your attendees to communicate with your during your event.

Polls: As standard with a premium supported event, we can add any polls you require. Please send these over to events@workcast.com for us to add in for you.
Resources: Here you can add any documents or links that you like, this will appear in the 'Resources' tab of your Auditorium page. Best practice is to ensure there are no special characters or spaces in the file name before uploading.
Additional logo: This is typically a sponsor logo which will appear to the top right of the page. Recommended sizing is no larger than 250 pixels in width. If you struggle with this, please email it over to events@workcast.com 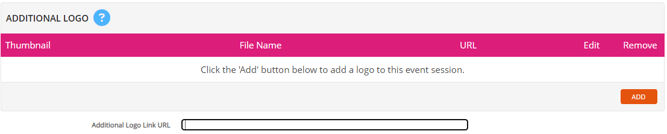

Please ensure you click the green SAVE button after making changes and before you move onto the next section.
![]()
Submit for review
Once everything has been added and you have saved every page, you can now press the Submit for Review button.

When you press this, a pop-up will appear which will tell you everything you have edited. It will also give you the option to tick certain things that are not already listed, for example, anything in the extras tab of the event experience. Finally, it also gives you an additional comments section where you add any comments you feel necessary. For example, you struggled with adding a sponsor logo, so you're letting us know that you will send that across to us via email.
If you have any issues or questions please email events@workcast.com.