Quick Links
What are Form Fields and where can I find them
Editing and Deleting and Re-ordering Form Fields
Opt-in with question and answers
Opt-in no question and only answers
What are Form Fields and where can I find them
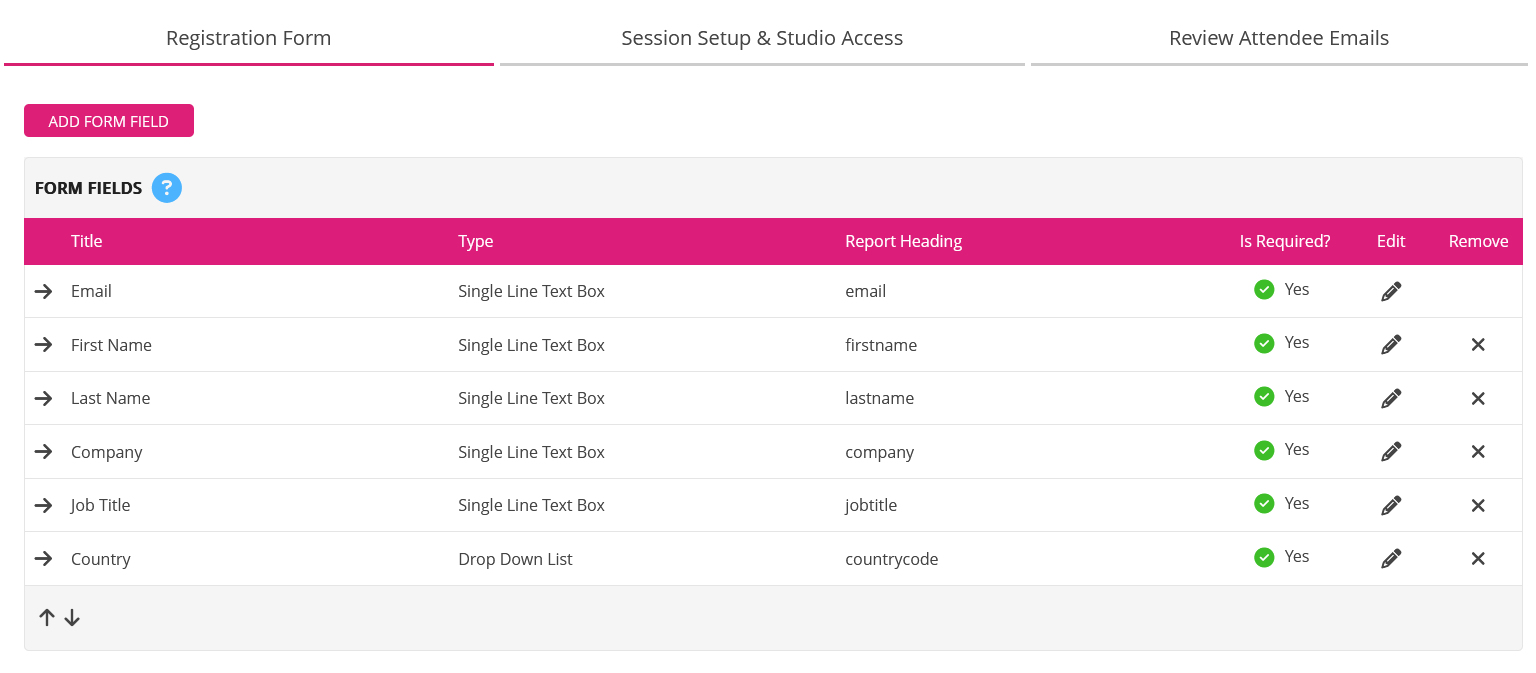
Form Fields are the questions you ask your attendees to gather their personal information. These can be basic such as their name and email address or more personal such as their job role, address and telephone number.
In order to function, your form must include at least the email address field.
Form fields can take the following formats
- Single Line Text Box - a free text field to be typed into
- Multi-Line Text Box - a larger text field to be typed into (the height can be specified)
- Drop Down List - Single choice with set answers displayed as a drop-down box, you must add a blank display text and blank report value as the first option to start with (this ensures an actual answer is not auto-selected and no incorrect reporting would be produced from the question)
- Radio Button List - Single choice with set answers displayed as a list
- Check Box List - Multiple answer choice with set answers displayed as a list, allowing users to submit 1 or more answers
When creating your master template with our onboarding team you may have requested specific fields be added to your registration page tab. These fields will auto-populate on every event created from the template but can be removed or edited as needed on a per-event basis.
If you’d like to add, remove or edit these pre-loaded settings please reach out to support@workcast.com and CC in your Account Managed and we'll look at this for you.
Adding a Form Field
To add Registration Form Fields to your event, navigate to the Registration Form tab and click ADD FORM FIELD
Form Fields can either be Standard or Custom. There are a number of standard fields to choose from or custom fields can be added if you do not see your question.
Standard
When the Add form field pop up first appears the Standard text field checkbox will be ticked.

Type - within this drop down you will see a list of questions available. i.e Email, First name, Job title etc.
Display Title - You can change how the question displays on your registration page. i.e change Email to Business Email.
Report Heading - this will pre load depending upon the option (Type) selected.
Is Required? - If the field is mandatory, please ensure you select the box next to Is Required.
Custom
To add a custom field click the Custom field or Multi - choice list checkbox

Type - within this drop down you will see a list of options available. i.e Single-line text box, multi-line text box, drop-down list, radio button list, or checkbox.
Display Title - This is where you type the question you’d like to ask as you’d like it to display on the page.
Report Heading - This is the heading which will show on your reporting.
Is Required? - If the field is mandatory, please ensure you select the box next to Is Required.
If you’ve selected drop down list, checkbox list, radio button list you will see additional text boxes appear to Add Option
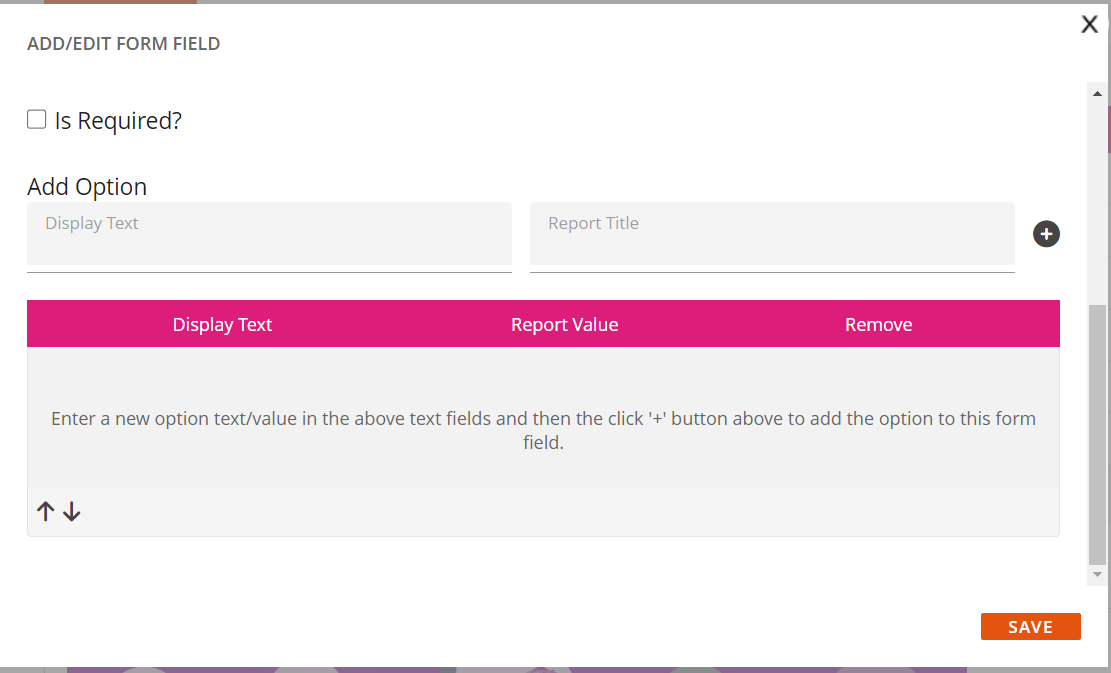
Here you will add in the options available for registrants to choose from. Adding how you’d like them to display and also how you’d like this to show in your report. To add an option once you’ve filled the Display text and reporting title click the +
(Please note: report headings should be lowercase with no special characters or spaces)
Editing and Deleting and Re-ordering Form Fields
To edit an already created form field, locate the question in the list and click the Pencil icon.
The Add form field pop up will appear allowing you to edit everything but the Reporting Heading.
To change the report heading you would need to delete and re-add the Form Field.

To delete a form field simply click the X icon.
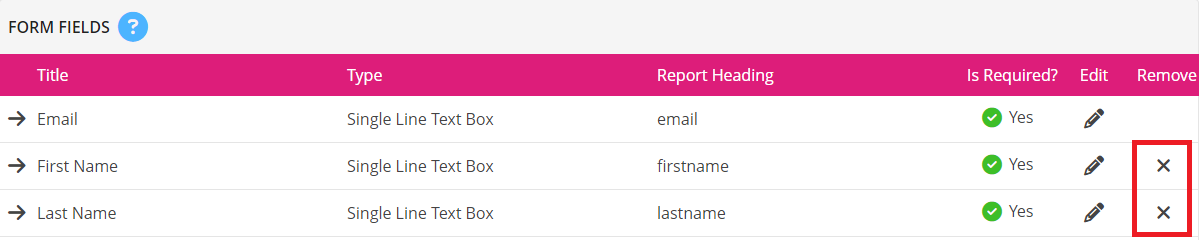
To Re-order your form fields, select the arrow to the left of the question you'd like to move. This will then highlight the question in green. Once highlighted use the up and down arrows to navigate it to the correct location within the list.

Adding Statements
Statement with no links
Example: During the event, you are able to ask questions, there is a question box on the event page located under the media player.
To add this:
-
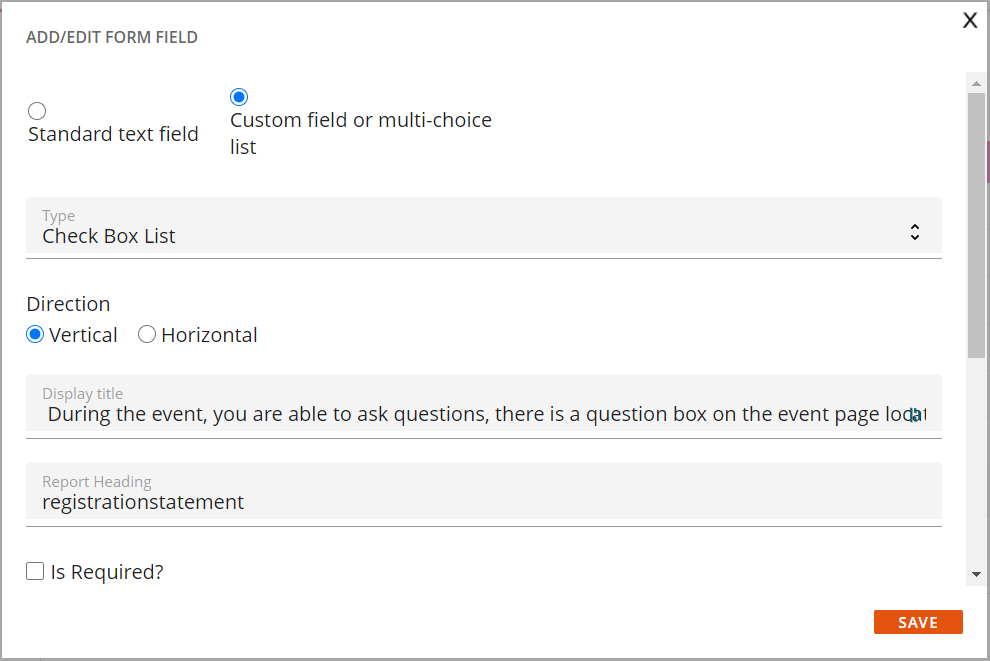
Click ADD FORM FIELD, choose Custom field or multi-choice list.
Type: Check Box List
-
Display Title: paste/type your statement into this
Report Heading: Put as something relevant, so it could be "registration-statement" or "statement" etc.
-
Is required: Ensure you do not tick that it is required, as it is a statement.
Then press Save
Ensure after this, you press the Green Save bar, you will then be able to press Preview form or Publish draft.
Statement with links (word/phrase)
Example: By registering for this event, you are agreeing to WorkCast's privacy policy.
To add this, you first need to paste the text into a form content box and follow the WYSIWYG to add a link.

Highlight the word/phrase you wish to link, then press ‘insert link’ and paste the link into the part where it will say ‘http://’ and select Open in new tab
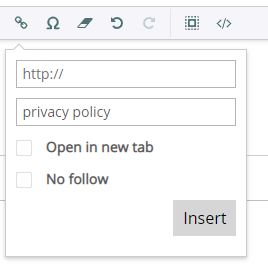
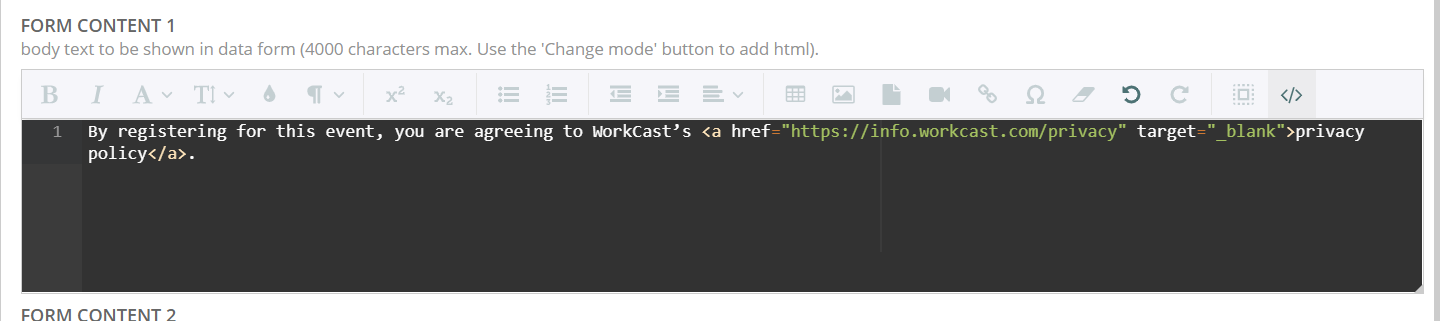
Now you’ve added that you need to click into the source, which is the character at the end of the row.

By clicking that, it will show you the wording with the HTML coding.
You will need to copy the full text including the HTML and then move back to the Form Field section:
-
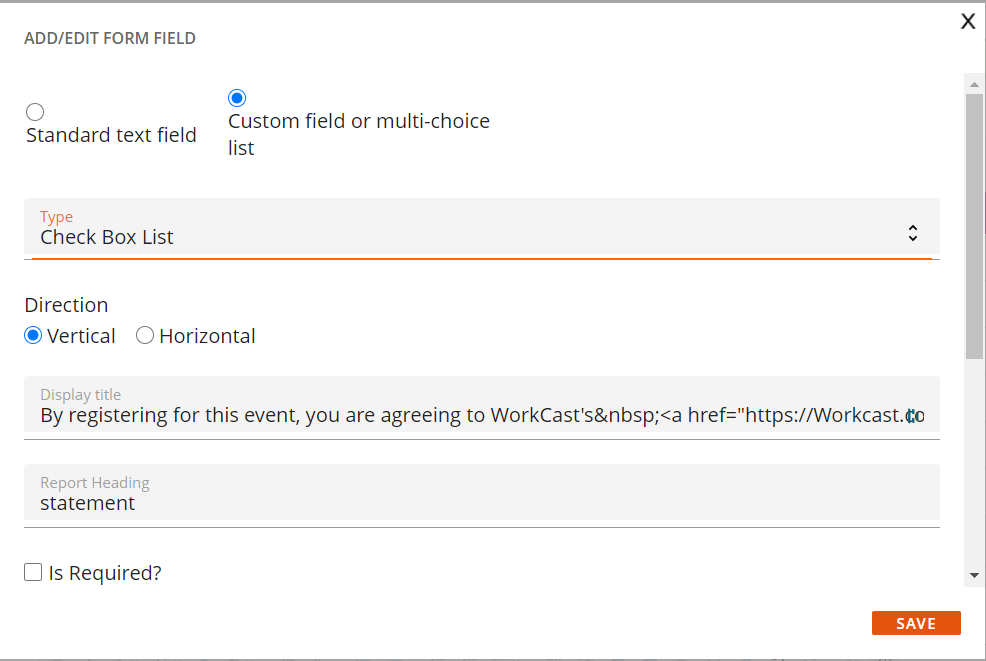
Click ADD FORM FIELD, choose Custom field or multi-choice list
Type: Check Box List
Custom Title: paste/type your statement into this
-
Report Heading: Put as something relevant, so it could be "registration-statement" or "statement" etc.
-
Is required: Ensure you do not tick that it is required, as it is a statement.
Then press Save
Then, you will need to delete the text out of the form content box as you no longer need it in there. (This was added in there to be able to link the text and gain the HTML)
Ensure after this, you press the Green Save bar, you will then be able to press Preview form or Publish draft.
Adding Opt-in’s
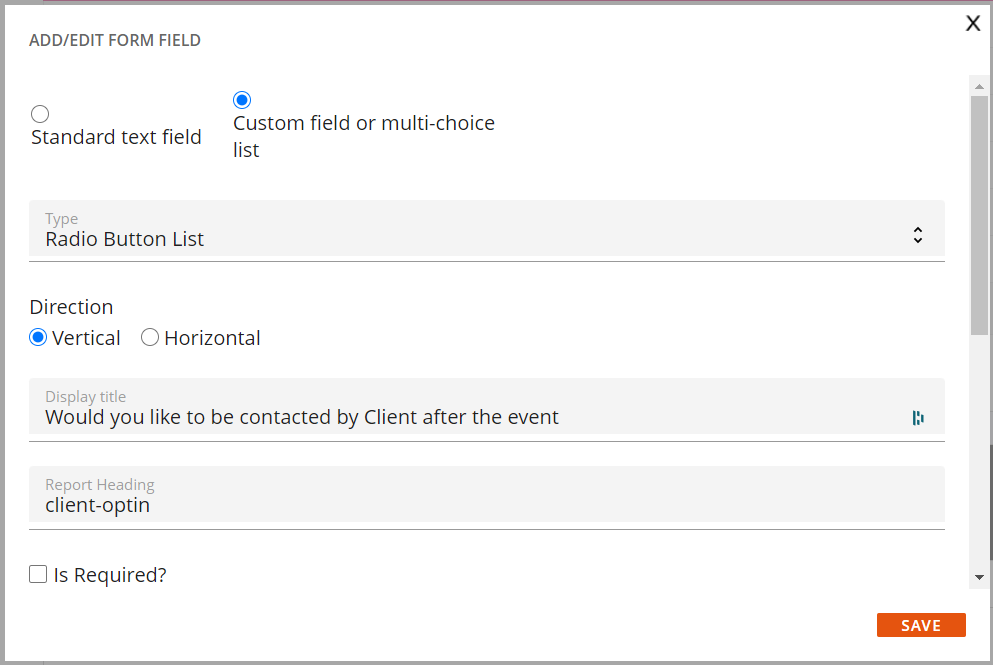
Opt-in question with answers
Example:
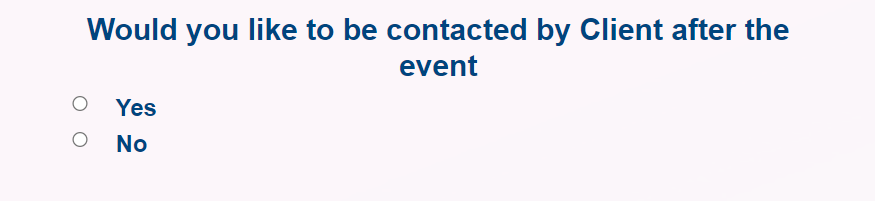
Q. Would you like to be contacted by Client after the event
A. Yes /No
How it would display below:
To do this:
Click ADD FORM FIELD, choose Custom field or multi-text box.
-
Type: Check Box List (if it is multiple choice), Radio Button (if only 1 option should be selected)
-
Direction: Vertical or horizontal based on how you’d like them to appear.
-
Custom title: Your question
-
Report heading: Something similar to 'communication-opt-in' or relevant word-opt-in
- Is required: If the question is required, please tick that box.
Use the scroll bar to scroll down the page where you will see Add Option Here you will add in your options/answers
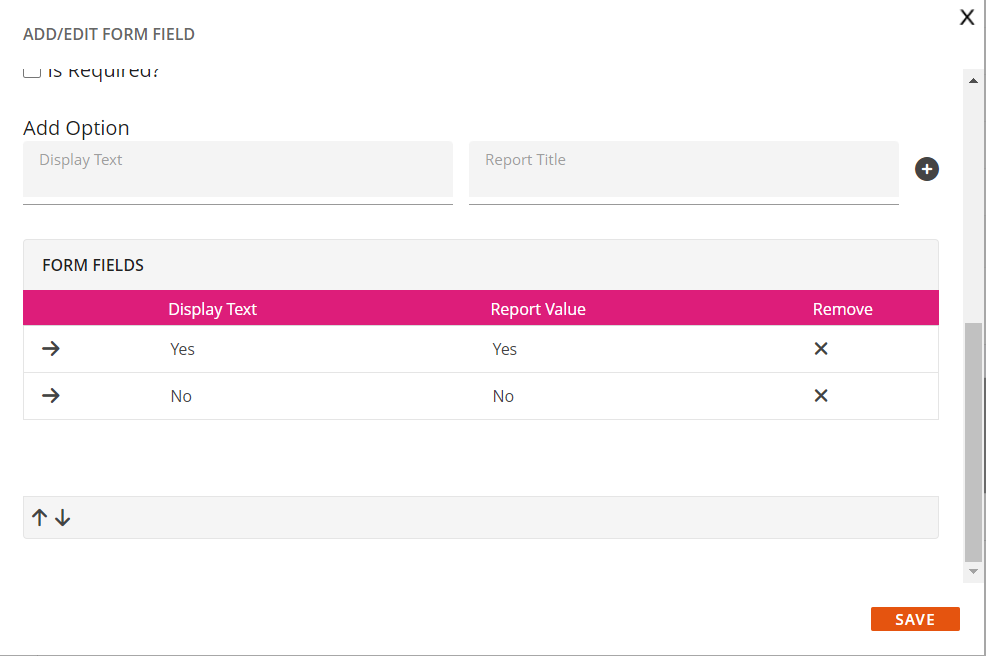
- Display text: This is what the registrations will see
- Report Value: This is what will pull through on your reporting (We recommend it to be the same as display text or something very similar)
- Press the plus button
- Once all options/answers are added, click Save
Ensure after this, you press the Green Save bar, you will then be able to press Preview form or Publish draft.
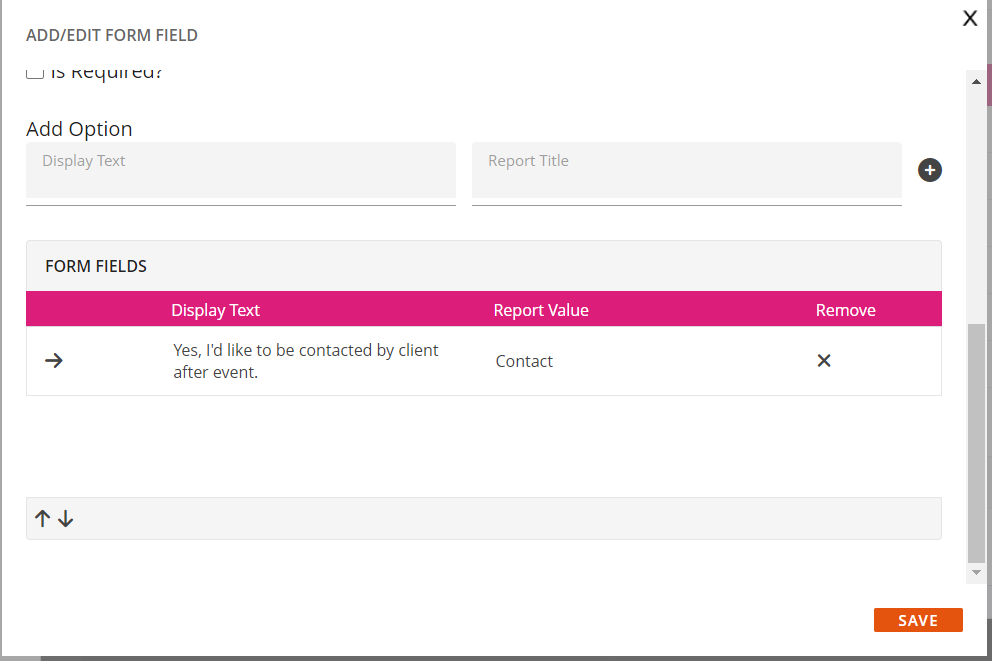
Opt-in no question and only answers
Example:
Q. Blank
A. Yes, I’d like to be contacted by client after event.
How it would display below:

To do this:
-
Click ADD FORM FIELD, and select Custom field or multi-text field.
-
Type: Check Box List(if it is multiple choice), Radio Button (if only 1 option should be selected)
-
Custom Title: Copy and paste the following HTML code into the text box replacing EXAMPLE Q to say what the question is i.e EMAIL OPT-IN
<span style="color:#FFFFFF;display:none">EXAMPLE Q</span>
-
Report heading: opt-in (or something similar and easily identifiable for you)
-
Is required: Non-required (as it is an opt-in)

Use the scroll bar to scroll down the page where you will see Add Option. Here you will add the answers.
-
Display text: Example text: Yes, I’d like to be contacted by client after the event
-
Report Value: contacted (or something similar/relevant)
-
Press the plus button to add it to the list.
Once all options/answers are added, click Save
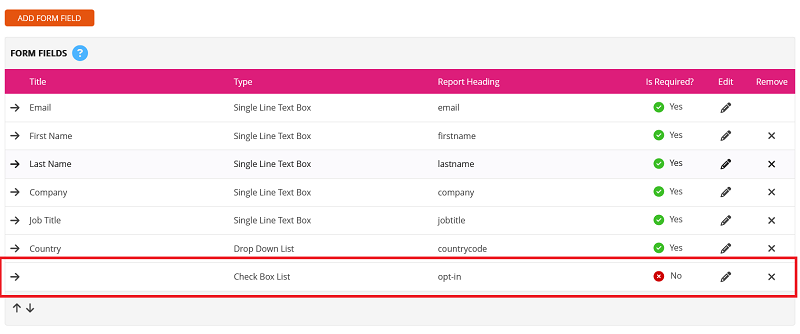
This is how it will look in the back end:
Ensure after this, you press the Green Save bar, you will then be able to press Preview form or Publish draft.
Next steps.. adding content to your Registration Form