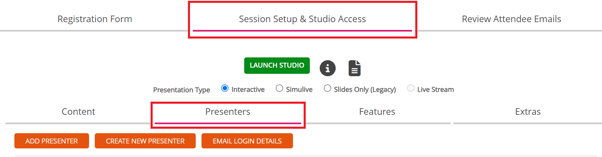
Presenters Tab
The Presenter tab can be found in the Session Setup & Studio Access tab of your event.
Here you can create and add presenters to your event, choosing what presenter information you'd like to appear on your Registration and Auditorium pages. You can also send the login details and studio access URL directly to their contact email address.
Quick Links
- Add Presenter
- Create New Presenter
- Email Login Details
- Get the Magic Links for Presenters
- Edit a Presenter
- Remove a Presenter from event
Add Presenter
When a presenter user is first created, the details are stored within your account and can be used on multiple events.

To add a previously configured presenter click the Add Presenter button.
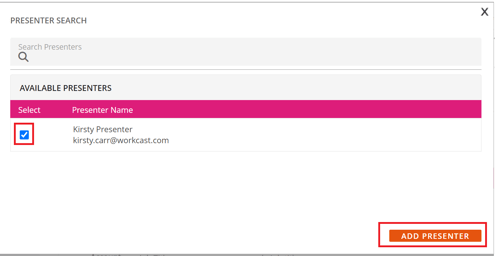
In the pop up you will see a list of previously created presenters. To the top of the pop up you will see a search bar, here you can type a presenter name to locate their user quickly. Once located, to add them to the event click the checkbox to the left of the presenter details and finally click Add Presenter.
They will now appear in the list of presenters in the Present tab. To save the changes on the event click the green Save and blue Publish Draft buttons.

Create New Presenter
To create a new presenter within your account click Create New Presenter.

A pop up will appear to add presenter information. There are two sections to creating a new presenter
1. User Details - This is basic information needed to create the presenter user.
-
Username: We recommend this be their first and last name with no spacing or special characters
-
First name
-
Last name
-
Contact Email Address: This is the email address the login details will be sent to. This must be unique to each presenter.
To create the user with only the user details once the above is populated scroll to the bottom of the pop up and click Save.
Note: If you create the presenter with only the user details populated they will be available within the presenter list, can receive login credentials but will not show on the published registration/auditorium pages.
2. Display Details - This information will display on your event Registration and auditorium pages. All are optional.
- Display name: here you can add the presenter full name and any titles you’d like to display
-
Job role
-
Organisation
-
Presenter image: here you can upload an 80px X 80px headshot image of your presenter. If your image is larger than 80x80 you can resize using a free tool such as befunky. We recommend png or jpg image types.
-
Biography: Tell your registrants about your presenters by adding content into the text box. You can format the text or add links using the WYSIWYG. This content box has a 4,000 character limit.
Once all display details have been added click Save in the pop up and your presenter will show in the Presenter list. To save the changes on the event click the green Save and blue Publish Draft buttons.
Email Login Details

For your presenters to access the studio, you will need to email them their login details for the event. This email is generated from the platform and sent to the email address listed as the contact email address.
You will see a list of your added presenters and their contact email address.

You can select the Calendar Start Time. This is the time prior to the live event time that you would like your presenters to join the studio (their email will include a calendar invite for this time). This is defaulted to the recommended 30 minutes pre-call time that we specify in our best practice. The pre-call time is only needed to create a calendar invite that is sent along with a Magic Link.

You can select using the checkboxes in the Email section which presenters you would like to email with their logins.
Select to either send username/password or send Magic Link to your presenters.

Note: If you have chosen to send the username and password, your presenters will receive an email which will include the following:
- URL to the WorkCast Studio for the event
- Username and password to login to the WorkCast Studio
If you have chosen to send the Magic Link, your presenters will receive an email which will include the following:
- A custom URL to the WorkCast Studio for the event that will log them straight in without a username and password
- A calendar invite to the the event which includes the selected pre-call prior to the live event time
Get the Magic Links for Presenters
There may be times that you need to access the magic link to send to a presenter last minute or via a different method than email. You can do this so quickly and easily with Magic Links.
Next to each presenter you will see an option for the Magic Link. Click on the copy link icon next top the presenter to copy the Magic Link to your clipboard. You can then paste this in any message you send to your presenter.

Editing Existing Presenters
To edit an existing presenter click on the Edit icon next to their details.
A pop up with all pre populated details will appear and you can change all details but the username.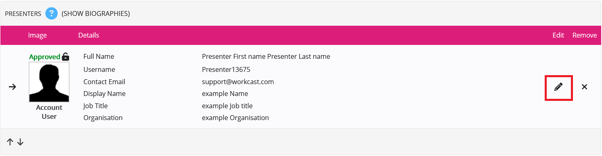
Once all edits have been made save the changes in the pop up window and finally Save and Publish Draft to apply to the event.
Remove a Presenter
To remove a presenter from an event click the X to the right of their presenter details.

Once removed from the list click Save and Publish Draft to apply the changes to the event.