As post emails automatically activate after you have created and published the on-demand, if you do not want post emails to go out for a specific event it is important that you first REMOVE any post emails schedules before creating/publishing your on-demand event.
-
Post Event - Attended - sent only to registrants who attended the Live event
-
Post Event - Did not attend - sent to registrants who did not attend the Live event
You can also choose to send only one post email to all registrants. To do this check the same as Attended? Check box in the Post Event - did not attend section.

As part of your Master template there will be 1 post email template available for both sections of the event. If you’d like different templates to be used for post attended, and post not attended please reach out to your Account Manager to discuss.
To edit your emails we recommend the following steps:
-
Deactivate emails if activated.
-
Make changes (use the image below to learn more about the sections you can edit)
-
Add emails to the schedule
-
Test emails
-
Activate
Scroll to the Post event email sections.
-
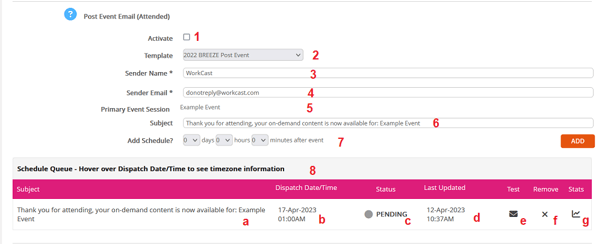
Activate: this is where you activate/deactivate the reminder emails. When you have completed any edits to the email section please ensure you check this box to reactivate the Reminder emails to dispatch to your registrants.
-
Template: This is the email template used on your post event emails. Typically this will be the same template and will be titled similar to Post Event 2023. To change the template used to an alternative click the drop down option where a list of all available email templates will show ready to be selected. Note: Standard email templates will not be branded to your organisations colours.
-
Sender name: this is typically your company name but can be changed
-
Sender email: this is typically your company name @mail.workcastevents.com. This can be changed however we’d recommend keeping the domain as @mail.workcastevents.com so this is not filtered into the junk/spam folder of your attendees.
-
Primary event session: The event title will show here.
-
Subject line: this is the subject you’d like to show on your post email. Please note, you are able to have a different subject line for each post event email. How to do this is found below.
-
Schedule: Using the drop down options you are able to schedule post event emails to go out up to 30 days after the event.. The options available are in Days, Hours and Minutes. Once happy with the time click the Add button to place into the queue.
-
Schedule Queue: this is where your already scheduled emails will display once they’ve been scheduled. Here you can see email information such as
-
-
Subject line - this is specific to the scheduled email when it was queued. If incorrect you would need to reschedule the email to update.
-
Dispatch Date/time - this is the date/time the email is scheduled to dispatch based on the day, hour, minute you selected. (Please note the Timezone will match that of the event. I.e if the event is GMT and the dispatch time states 11am this will be GMT.)
-
Status - Prior to the scheduled time this will show as Pending. This will then change to Processing when the email is dispatching and finally Dispatched when all emails have been sent.
-
Last Updated - This shows when the email was added to the queue
-
Test - Once you’ve scheduled the email, click on the envelope icon to send yourself a test to see how this appears to attendees.
-
Remove - by clicking the X icon you can remove any email from the queue.
-
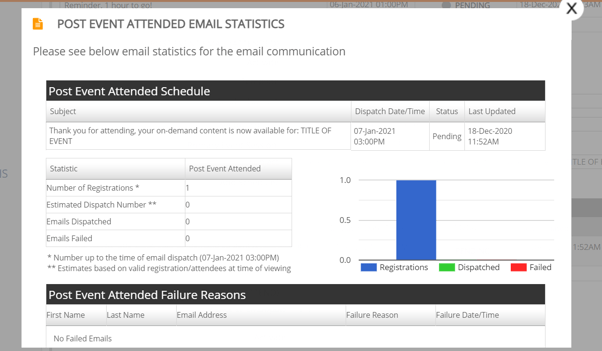
Stats - Here you can see how many emails were successfully dispatched to your registrants. This will also show any emails which failed and the reason why.
-