Overview
Log into the WorkCast platform and click into the event you wish to edit.
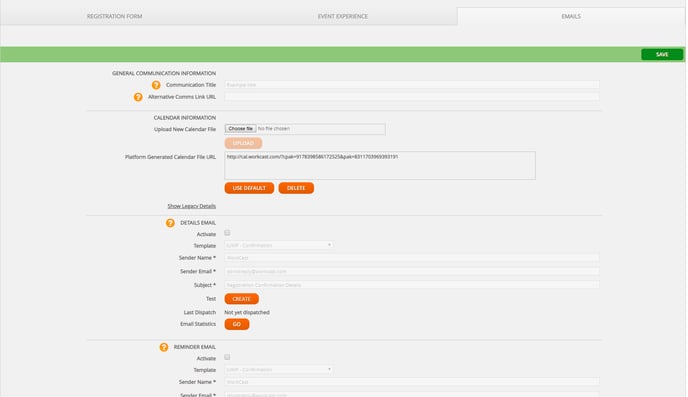
Once you are in the event, you will see the Emails tab, please click into the tab.

Within the emails tab, if you want to edit, you must ensure all emails are deactivated.
To do this, unlock each email (this will be the tick box that is next to the word Activate), once you have unticked all, press the green save bar at the top of the page.
When you press the green save bar, the emails will go from grey to white. You can now edit.
First, you will see the Communications Title
When you create an event and put a title on, this automatically pulls through to the communication title. So, if you do end up changing your event title, please ensure you also update the communication title, otherwise, the original title will still display.
Alternative Comms Link URL
This will be blank to start with and can stay blank for most events. However, if you are embedding your event onto another webpage, you will need to add the URL that the event is playing within there. This updates the join the event in the email communications and will direct to the link within the Alternative Comms link URL, rather than the WorkCast event page.
Calendar Information
This is to be used if you were sending your own promotional emails outside of the WorkCast platform. It is possible to add the Platform Generated Calendar File URL to your email campaigns this will then show Add to Calendar within the Platform generated email communication.
Show Legacy Details
This would only be used if you wish the date and time to display differently from the standard format.
Enter your date/time of your event in here and how you want it displayed. This means you are able to add multiple timezones to it and it will display in the body of your email – for example, Monday, 3rd December 2018 at 9am GMT/10am CET.

The other options in the show legacy details tab are not applicable for clients unless stated by a WorkCast colleague in your template creation process.
Webinar Details/Confirmation Email
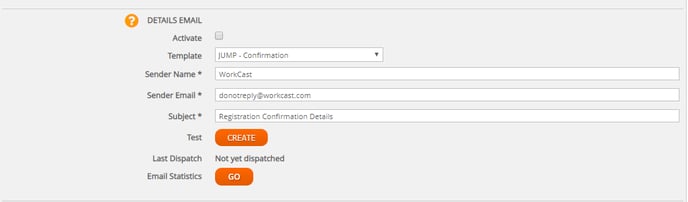
This information will be set on your template, however, if required can be changed on a per-event basis.
If you wanted to change the email template, you are able to do this by going to the drop-down menu next to the word 'Template' and selecting the option you wish to use. Please see the screenshot above to further explain this.
The sender name can be whatever you like, but as standard, it will be set to your company name.
The sender email again can be what you like, as standard in the build of your template we will put your company name @mail.workcastevents.com – unless told otherwise. For example workcast@mail.workcastevents.com
Subject - we will put a standard subject line for your email that can be applied for all events, however, you do have the option to change this on a per-event basis to suit your event.
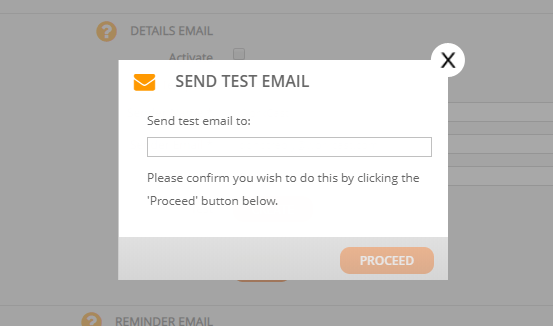
Test after you have finished editing your information and pressed the green save bar that will appear at the top of the page, you are able to send yourself a test email by clicking create, a pop up will appear, and then enter your email address in. Once you have entered a valid email address, then proceed button will turn orange for you to press.
The last dispatch will advise when the last email was dispatched when you do activate your emails to start dispatching.
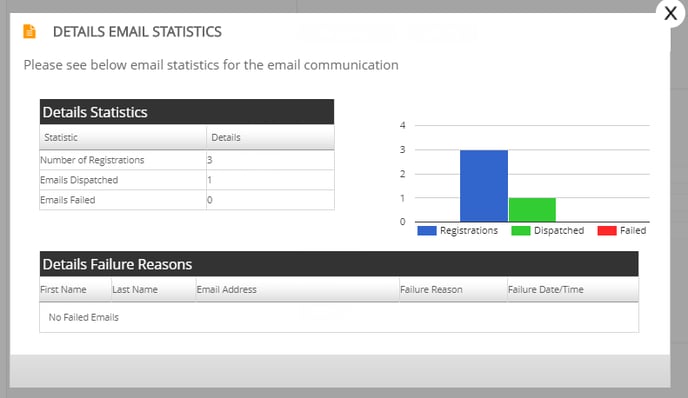
Email statistics, you can press this at any time to see how many emails have been sent, against how many registrations you have, this will also advise if any emails failed and give you the reasons why. (This will only populate once you have activated the emails and people register for the event.)
Webinar Reminder Emails

For the template, sender name and sender email it is exactly the same as the confirmation, you are able to have this as whatever you like. We would recommend you choose the same sender name and email address as the confirmation to keep consistency for your registrants.
Primary event session – this is just to advise you’re setting reminder emails up for the event listed there.
Subject line – You can have the subject line as whatever you like and this is changeable per event. We will set a standard subject line for reminders on a template basis.
Schedule – this is where you add your schedules for reminder emails. As standard, your template will usually be set to have a reminder email 1 day before your event and 1 hour. This, however, can be what you like, some clients like to have more reminder emails, for example, 1 week before the event, or 3 days before. Some clients also like to add one 10 minutes prior to the start time. You can see it gives you the option to add how many days, hours, and minutes.
Webinar Post Event Emails
There are 2 options for post emails, you can send a post-event email to those who have registered and attended, and one for those who have registered but not attended.
Some people decide just to send one post email with the same subject line, others like to send a different one with a different subject line.
As standard, we create 1 post email template, but if requested we will create one for post attended, and post not attended if you require different text in the body of the email.
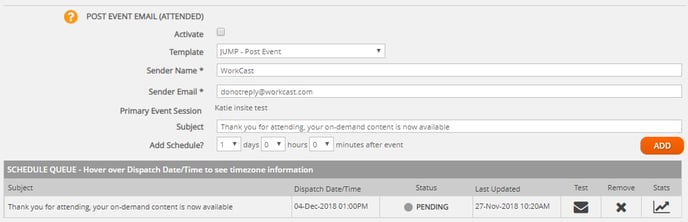
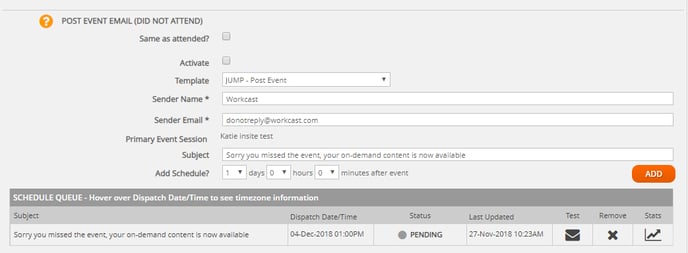
Above are 2 screenshots, one of the post emails attended, and one of the post email not attended.
The post emails work in the same way as the other emails in regards to the template, sender name, sender email address, subject line, and schedules.
As standard, when setting up your template we will have a post email set to dispatch 1 day after your event has taken place (as long as you have created the on-demand of your event by then).
Note: When you create the in demand of your event, the post emails will automatically activate for you. If you know you do not want any post emails to go out, you would need to go into the emails tab before you create the on-demand, and remove any schedules.