![workcast_logo_orange-01.png]](https://insite.workcast.com/hs-fs/hubfs/workcast_logo_orange-01.png?height=50&name=workcast_logo_orange-01.png)
Prefer to watch a demo? 
Quick links
How to login to the WorkCast Interactive Studio
OPTIONAL PODS - Pod options menu
How to login to the WorkCast Interactive Studio
The organisation hosting your event will provide you with login details for your event(s). Click the link or copy and paste the URL into your browser.
This will take you directly into the WorkCast Studio with no additional details needed.
Upon first entry, the WorkCast studio will look like the below:
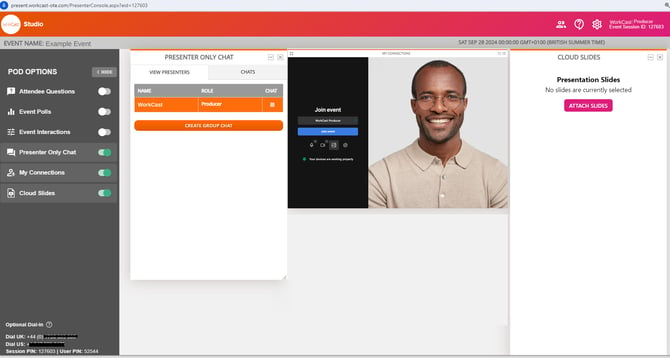
Here you will see the Pod options menu bar to the left of your screen with the Presenter Only chat pod , My Connections Pod and the Cloud Share pod open and activated.
Note: All pods within the studio are re-sizable and can be moved. To resize the pod, click the bottom right of the pod and drag to the size which best suits you. To move the pod, click the title of the pod and drag this to the desired location in the studio.
My Connections Pod
This is the pod you will use most throughout the event. Here you can connect your webcam and audio, hear and see other presenters, share your screen and where Cloud slides will show to attendees.
The My Connections pod will first load to the Studio Lobby.
Similar to other online meeting tools, you will have the option to edit your display name 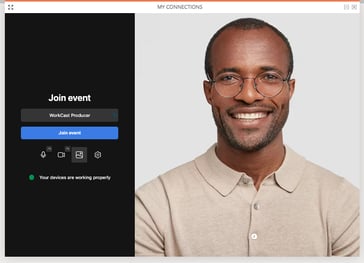
 Choose whether to join muted or unmuted
 Turn your webcam on or off
 Apply a virtual background - including the option to blur your background.
Before clicking to Join the event.
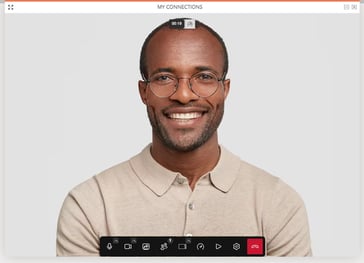

- Mute / Unmute - turn your microphone on or off. Click the arrow to choose your microphone and speakers.
- Webcam on / off - turn your camera on or off. Click the arrow to choose a different camera or add a virtual background.
- Share your screen - share your entire screen, an application window or a browser tab.
- Participants - see everyone connected in My Connections. The number shows how many people are connected.
- Change mode - choose your layout: Tile view, Trio view or Stage view. This only changes your own view, unless the producer has turned on Follow me.
- Performance settings - lower your video quality if your internet connection is weak.
- Share video - share an MP4 or a YouTube link.
- Settings - change your audio, video, virtual background and general settings.
- Leave - disconnect from My Connections.
Cloud Share Pod
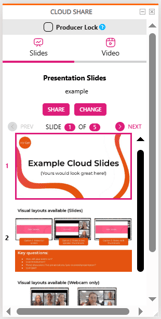
Slides - If your event has a shared slide deck your producer will make these available in the Slides tab within the Cloud Share pod to use during your live event.
Your producer will likely Select and Share the slides to the My Connections pod for Presenters and Attendees to see.Once shared, You can navigate the slides by clicking NEXT to advance or PREV to go to a previous slide.
Alternatively you can click on the image of the slide you'd like to display to attendees.
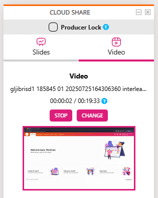
Video - If you have pre-recorded media to play during the event, your producer will make this available within the Video tab.
Your producer will likely Select and Share the media to the My Connections pod for Presenters and Attendees to see, and stop this when the media has ended.
Once shared, you are able view the countdown time measured in hours : minutes : seconds against the duration time of the video.
Presenter Only Chat
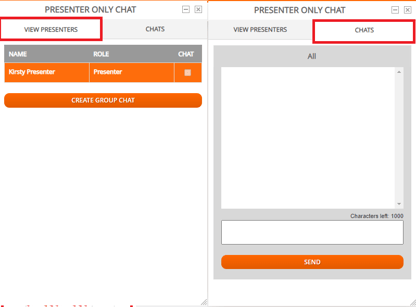
Presenter Only Chat pod allows you to see who is available within the studio (View Presenters tab) and also to communicate with Producers and presenters within the studio (Chats tab).
Attendees cannot see this chat.
Additional pods and how to access them:
Pod options menu
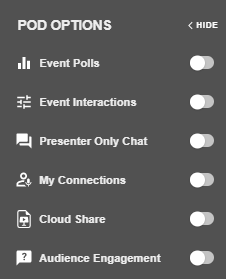
Located to the left of your studio view, here you can choose the pods you'd like to activate within your WorkCast Studio view.
To activate a pod click the toggle to the right of the pod name. This will change to green indicating it is activated.
The pod will then show in the main studio window, click the + icon to open this into view.

If you’d like to remove a pod from view, click the toggle again or X on the pod.
Audience Engagement Pod
If your event is set up for attendee’s to ‘Ask a question’ you will have the Audience Engagement pod available in the above list. In this pod you will see four tabs.
Priority – this is where you can sort the attendee questions you think most important.
Inbox – this is where all attendee questions will first populate.
AI - WorkCast's AI Facilitator can create a list of questions based off your content such as your title, overview and any slides added into Cloud Share for your event.
Trash – you can delete any question you don’t believe is relevant.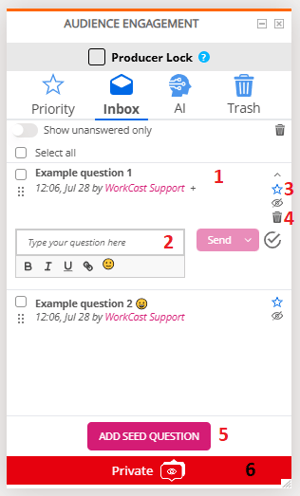
-
Your attendee questions will appear in the inbox. To see the full question and the options click on the question.
-
To reply, you can type your response into this box. When clicking Send, you choose to reply privately or publicly. (Note: if you click to reply publicly all attendees in the auditorium will see the question and the response).
-
If you’d like to Prioritize a question, click this star icon. This will then move to the Priority list accessible by the Priority tab.
-
If you’d like to delete a question, click this trash icon. This will then move to the trash tab. You can empty this tab by clicking the ‘Empty trash’ button.
- You can add seed questions straight to your Audience Engagement pod via the ADD SEED QUESTION button. Seed questions will show as Anonymous (seeded) in the Studio view. In the attendee view no names will show on any question or comment, whether seeded or not.
- The Audience Engagement pod is automatically set to Private mode, which means attendees will only see the question they have submitted. This can be changed to Public at any time by clicking the red Private bar on the pod. This allows for attendees to see all questions and answered submitted. This can also be changed back to Private at any time.
Polls Pod
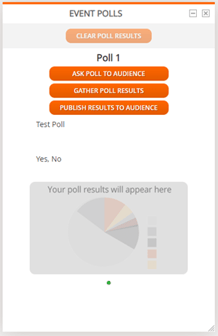 Questions you’d like to ask your attendees during the event will be loaded into the Polls Pod. Your moderator will likely control this pod however you are able to Ask Poll to Audience, Gather results and Publish these to your audience.
This is where you will view results of any multiple choice or drop down option question within the studio.
Please note: you will not be able to see text based responses within the studio. Instead this will be available in the event reporting which the organisation running the event has access.