- Control over your data - added on an event-by-event basis
- Easy to setup - use new or existing HubSpot Forms
- WorkCast reporting - registration data combines with attendee data to give a full picture of your event engagement
- This has to be setup or changed on HubSpot per event as requires the specific event session meid and pak
HubSpot Registration Forms
Standard HubSpot form functionality can be used to create Registration Forms that feed both the HubSpot Platform and the WorkCast Platform.
HubSpot Registration forms can be used to push registration data into the WorkCast Platform. This is done by means of a webhook through an HTML POST to the WorkCast HubSpot Data Usher interface. This interface is specific to HubSpot. Its purpose is to transform the standard JSON formatted Contact data into a form that the WorkCast Data Usher can then process.
Step 1 - Create a Form
This is a registration form that clients will fill out on your HubSpot landing page and submit it in order to register for WorkCast Event Sessions.
IMPORTANT: You MUST follow the steps exactly and ensure the form has ALL the required elements WorkCast needs.
You can modify an already created form within your HubSpot account if you wish to use that.
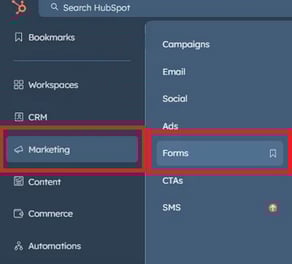
First, navigate to Marketing and Select Forms.
If you'd like to modify a form search for the available ones in the list. To create a new form click Create form
It is up to yourself whether you select to Embedded form or create a Standalone page when given the option.
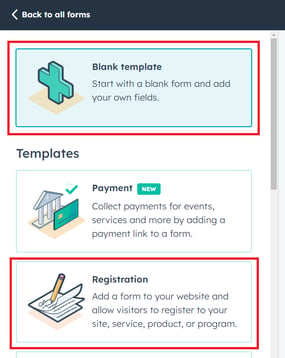
From the form options, you can then select either a Blank template or Registration template to start building your form. Once selected click Next
After giving it a suitable name, a basic form will be created containing the minimum required fields and a Submit button. Any required or additional fields can be added or amended using this screen.
A basic form will then be created ready to be updated.


Step 2 - Create three additional hidden form fields as below:
The WorkCast Hubspot Data Usher Interface requires the creation of the following 3 fields on the form (Redirect Success, Redirect Failure, and Data type):
| Label | Internal Name | Default Value |
| Redirect Success | wrk_redirectsuccess | https://www.workcast.com/registerthanks.aspx |
| Redirect Failure | wrk_redirectfailure | https://www.workcast.com/registerthanks.aspx |
| Data Type | wrk_datatype | dcdcfr |
To add the above-hidden form fields please see the instructions below.
Click on Create New which opens a new tab. Choose single-line text for these hidden fields.

Within the tab for each of the three hidden fields ensure you add the exact required Label name and Internal Name from the table above.

Click the </> icon to view and add the Internal Name.

Add the Default value using the exact URL in the table above. You will need to repeat this for all three hidden fields. Ensure you toggle to Make this Field hidden.

Step 3 - Ensure your form includes the following three standard fields
- firstname
- lastname
If you wish to use any further registration fields in your form, see our guidance on standard and custom registration fields.
Workflow
Step 4 - Create a new contact-based workflow
The Workflow is set up to link the actions of filling out a registration form with the firing of a Webhook. This webhook pushes the registration to the correct event within the WorkCast platform.
This should be created as a standard Contact-based workflow and you can name this accordingly.

Step 5 - Add your form as your workflow trigger
Next, click Set up triggers and select When an event occurs.

Choose Add criteria and select Form submission.
Add criteria and select Form name. Find and choose your form name that you added to your landing page. Click Done and Save your changes.

Step 6 - Setup a webhook in your workflow
Now click the + on the workflow to add an action. Choose Data Ops and Send a webhook.

It may depend on your HubSpot permissions or licence whether the option of sending a webhook is available to you. We recommend that you check with your HubSpot administrator.
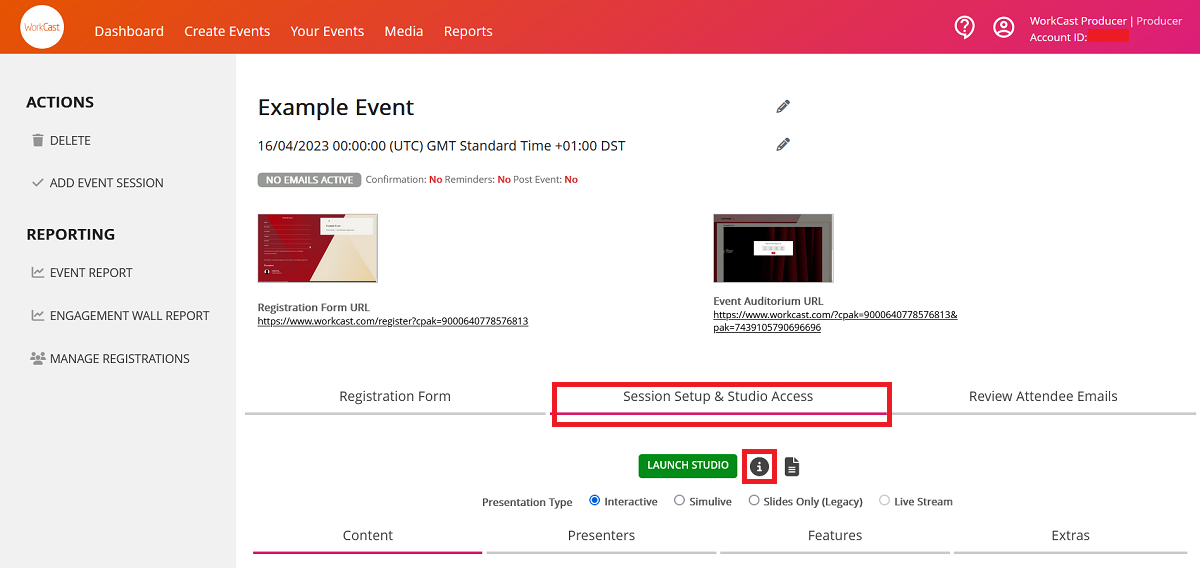
To ensure your webhook is setup for the correct WorkCast session you will need to get the meid and pak of the session you are wishing your form to push registrations to.
These can be found in the 'Session Setup & Studio Access' section of your event in the WorkCast Platform by clicking the 'i' icon. You need to ensure these values relate to your created WorkCast event. These numbers are unique and will change per event.
In HubSpot, add the below webhook details:
Method: POST
Webhook URL: https://i1.workcast.com/HSRelay.aspx?meid=?&pak=?
Authentication type: None
Add your meid in the place of the first ?
Add your pak in the place of the second ?

Step 7 - Publish your workflow
Review your workflow and double check your meid and pak within your webhook.
Ensure that you Review and publish the Workflow so that it is made Active.
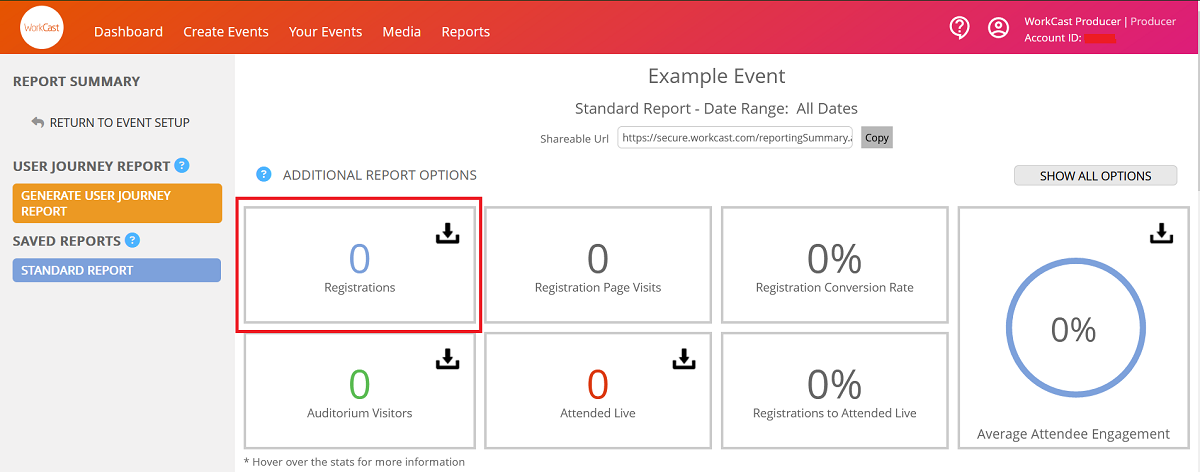
Once published, anyone that fills out the HubSpot Registration Form will have their registration data pushed to the WorkCast platform and registered for the relevant event. You should test after submitting the registration form to ensure your registration has been passed to the WorkCast Platform. You can do this by navigating to your event in the WorkCast platform and clicking Event Report. Here you should see the registrations number increase after submitting your HubSpot Registration form.
If you want to integrate your registration and attendance data from WorkCast to HubSpot, click here.
Step 8 - Share or embed your registration page
Depending on whether you've chosen to create an embedded or standalone form you can share this in multiple ways with your prospective audience. Please refer to HubSpot for further assistance with this if needed.
Standard and Custom Registration Fields
Any HubSpot form for a WorkCast event requires to have the following fields:
Internal HubSpot name is in brackets following each field
- First Name (firstname)
- Last Name (lastname)
- Email (email)
- Redirect Success (wrk_redirectsucess)
- Redirect Failure (wrk_redirectfailure)
- Data Type (wrk_datatype)
Additional standard and custom registration fields can be added with the following naming convention for the internal name:
wrk_fieldtype_reportheading_seq_questiontype
field type = standard or custom
report heading = WorkCast report heading, eg. company
seq = sequence number of fields eg. seq01 for the first additional field, seq02 for the second, seq03 for the third etc.
question type = type of question asked, eg. textbox, dropdownlist, checkboxlist, radiolist, textarea
For instance to add the company registration field to your form the internal name on HubSpot might be: wrk_standard_company_seq01_textbox
