Clients of WorkCast Business Pro and Enterprise plans have the option to integrate with Pardot. Find out how to integrate below.
Pardot Registration Forms
Standard Pardot Forms functionality can be used to create Registration Forms that feed both the Pardot Platform and the WorkCast Platform.
The following section describes how to create and configure a Pardot Form to push data to the WorkCast platform.
Form Layout Template
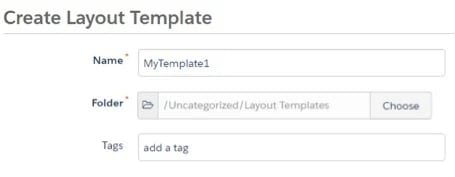
The first step is to create a new Form Layout Template in Pardot.
To do this, click on Pardot, Content, Forms, Layout Templates, and then select the Add Layout Template Button.
 Give your Layout Template a Name.
Navigate to the Form tab of the Layout Template.
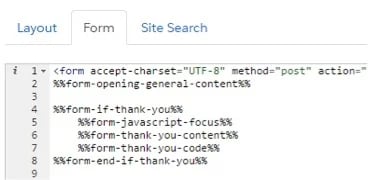
Delete the first line of text and insert the following code block in its place:
<meta http-equiv="Content-Type" content="text/html; charset=utf-8">
%%form-if-thank-you%% %%form-javascript-focus%% %%form-thank-you-content%% %%form-thank-you-code%% %%form-end-if-thank-you%%
<form accept-charset="UTF-8" method="post" action="%%form-action-url%%" id="pardot-form" target="_blank">
Your Layout Template is now set up and you can click the Create layout template button.
 Form
Form
A Form should be created using the Layout Template created in the previous step.
To do this, click on Marketing, Forms, New Form, and then select the Add Form Button and follow the Form creation wizard.

Name
Give your Form a Name and select a Campaign to attach it to.
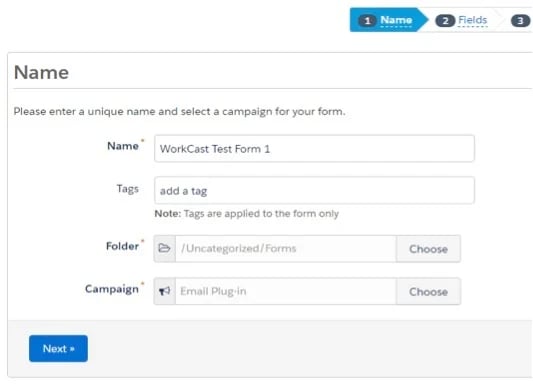
Click the Next button to move to the next step.
Fields
Add fields to your Form as required.
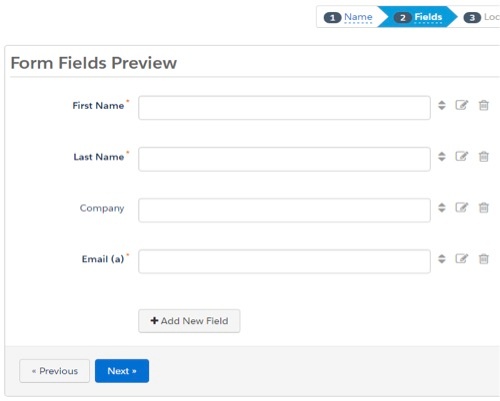
Custom fields can also be added to the Form.
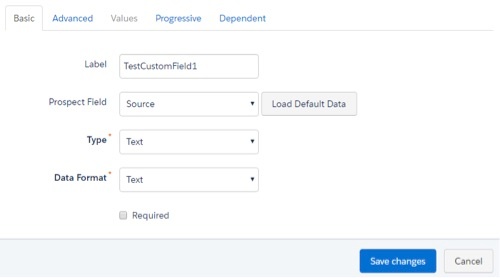
Save your changes and click the Next button to move to the next stage.
Look and Feel
Specify the Layout Template created earlier.
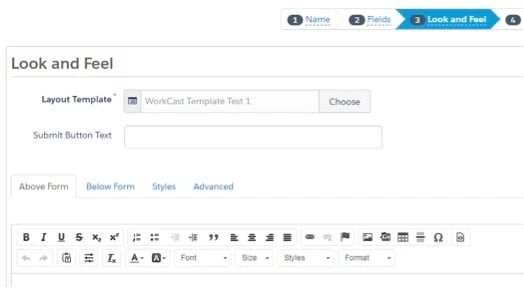
Click the Next button to move to the next stage.
Completion Actions
For this step, you will require the meid and pak values for your Event Session. These values can be obtained from either the WorkCast platform or WorkCast Support (support@workcast.com). Populating these two values correctly ensures that the registrant is registered against the correct WorkCast Event Session.
Once you have the required details, press the HTML (Source) button in the Thank You Content section on the Thank You Content Tab.
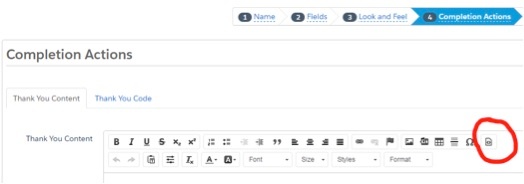
Paste the following code into the editor box, replacing the meid and pak with the values from the previous step:
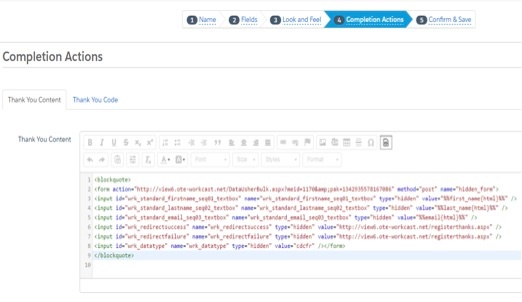
<blockquote>
<form action="https://www.workcast.com/DataUsher.aspx?meid=1234&pak=1234567890123456" method="post" name="hidden_form">
<input id="wrk_standard_firstname_seq01_textbox" name="wrk_standard_firstname_seq01_textbox" type="hidden" value="%%first_name{html}%%" />
<input id="wrk_standard_lastname_seq02_textbox" name="wrk_standard_lastname_seq02_textbox" type="hidden" value="%%last_name{html}%%" />
<input id="wrk_standard_email_seq03_textbox" name="wrk_standard_email_seq03_textbox" type="hidden" value="%%email{html}%%" />
<input id="wrk_redirectsuccess" name="wrk_redirectsuccess" type="hidden" value="https://www.workcast.com/registerthanks.aspx" />
<input id="wrk_redirectfailure" name="wrk_redirectfailure" type="hidden" value="https://www.workcast.com/registerthanks.aspx" />
<input id="wrk_datatype" name="wrk_datatype" type="hidden" value="cdcfr" />
</form>
</blockquote>
If you use a URL Mask you will need to replace the https://www.workcast.com text in the above block with the Url that you normally use to access a WorkCast auditorium. If you are unsure, this value can be obtained from WorkCast Support (support@workcast.com).
The code above follows the same format as a standard WorkCast Data Capture / Registration Form. Details of the fields that can be included in a WorkCast Registration Form are given in the WorkCast Data Capture Integration document (WorkCast_Data_Capture_Integration_v109.docx).
Every field that needs to be passed to the WorkCast Data Usher should be included as a <input> control in the above HTML code. The value property of the fields to be passed from Pardot to WorkCast, are in the form:
%%fieldname{html}%%
The standard Pardot field names can be found here.
Fields should be added to the Pardot Form using the usual wrk_standard or wrk_custom naming convention. Details of this can be found in the WorkCast Data Capture Integration document (WorkCast_Data_Capture_Integration_v109.docx).
For example a Pardot Form Field with a Custom Field ID of TestCustomField1 would be inserted in to the code block as follows:
<input id="wrk_custom_testcustomfield_seq99_textbox" name=" wrk_custom_testcustomfield_seq99_textbox" type="hidden" value="%%TestCustomField1{html}%%" />
The code above would create and populate a WorkCast custom contact field called testcustomfield.
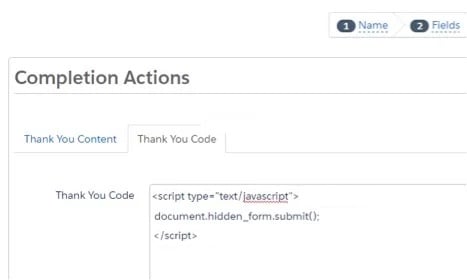
Also In Step 4: Completion Actions in the Thank You Code section on the Thank You Code Tab, paste the following code in to the editor box:
<script type="text/javascript">
document.hidden_form.submit();
</script>
Confirm and Save
Press the Confirm & Save Button to complete the Form creation wizard.

Landing Page
Once the completed and activated form is placed on a landing page, clicking the Submit button on the Form will cause the Registration data to POST to the WorkCast Platform Data Usher and the person will be registered for the event session that has been configured.